


![How to Migrate Products to Shopify [Easy].](http://www.zyber.co.nz/cdn/shop/articles/a49d0393-fca0-44a7-8274-39dc8f3b887b-1_2e3be453-2988-4e89-9b9b-9627eb607b46.webp?v=1738718286&width=1500)
Table of Contents
- Upload your products with an app
- Upoad your products manually
- Upload your products with a spreadsheet
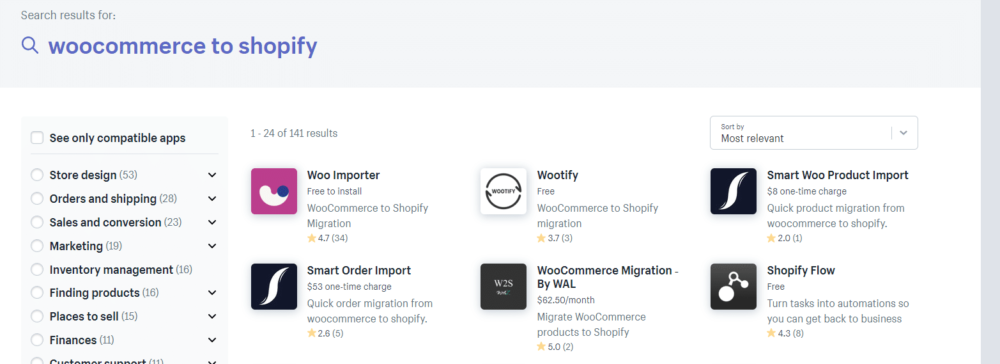
How to migrate products from an old eCommerce platform, onto Shopify
Moving products from your old eCommerce platform can be time consuming, so we’ve made this guide so that this crucial step of Shopify migration is as painless as possible.
There are three methods that will let you accomplish this:
- Use an app
- Upload each product manually
- Use a spreadsheet
Each method has its positives and negatives- we recommend reading this article to see what method speaks to you the most.
Method 1: use an app
If you’re migrating from another platform, this is the easiest way of accomplishing the task of moving your products over to Shopify- by using Shopify’s own app store. Essentially what you’ll be doing is searching the app store for a purpose-made app to move from your particular eCommerce platform, onto Shopify.
If you’re having trouble navigating Shopify, here is a step-by-step guide how to accomplish this:
In the toolbar, click “apps.” This is where you will be able to see all your installed apps. If you don’t yet have any, click “Visit the Shopify App Store.” There are dozens of apps being added to the app store every day, and the pre-existing ones are always changing, so we can’t recommend an app that will work perfectly for every use case forever.
If you’re coming from a platform of considerable size, simply typing in “[platform] to shopify” will return some results.
Click on an app that seems to be what you are looking for. You will be brought to a page where you can read more information about the app, and install it.

We recommend checking out the reviews, making sure you are looking at the most recent ones, and considering the pricing before deciding if the app is worth installing onto your store. From here, you’ll need to go back to the Apps section of your Shopify store.
Method 2: Use Shopify’s Backend
If there is no app that can interface with your old eCommerce platform, you might have to upload the products manually. If you only have a few products, create them individually in Shopify. If you have a lot of products, upload them via spreadsheet, which you can learn about in step 3.
Start by navigating to the “Products” section in Shopify. In the upper-right-hand corner, press “Add product.”

This will bring you to the product creation page, which looks like this:

Let me show you just how easy this is! You can either write the information yourself, or copy-paste it from your pre-existing eCommerce platform.
First, add the name you’d like to give your product, as it should appear on the website. Add the description of your product in the text box below. You can change text styles, such as heading, bold/italic/underline, bullet point, add images, etc. Whatever images you add in this text box will appear below the variant options.
There is a second place to upload images, below the description box.

Here, you can select images that are saved to your computer, and assign them to the product. Below this image section, you can add the price:

The compare-at price (appears next to the real price with a strikethrough, to make the real price appear cheaper by comparison.)

Here is how it appears on the front end of the website:

In Shopify you can also determine how much it costs you to acquire an item. Customers don’t see this, but you can use this to track your profits.

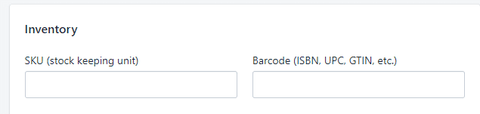
By default, taxes will be charged on your product, but if you’ve included tax costs in your price, you can un-check this. In the next section, you can add the SKU of your product, and the barcode if you use them.
And in the drop-down you can tell Shopify if you want it to track the quantity of this product or not.

If you want people to still be allowed to purchase this product when it’s out of stock.

If you are selling a digital product, uncheck the “this is a physical product” box.
Add the products weight. And your customs information, if shipping overseas.

Fulfillment service should be set to Shopify, unless you’re using a third-party fulfillment service like Amazon Fulfillment.
Next, the variants. If there are different options you can purchase your products in, such as different colors or sizes, press “Add Variant.”

You can add as many as three different options, with as many different values as you like.

You can assign a separate price, SKU, barcode, and inventory for each variant. If you’ve entered a SKU at the top of the page, it will automatically enumerate as you add variants.
After you’ve pressed “save,” you can drag images onto each individual variant.

Now, on the product page, the variant image will appear when the variant is selected.
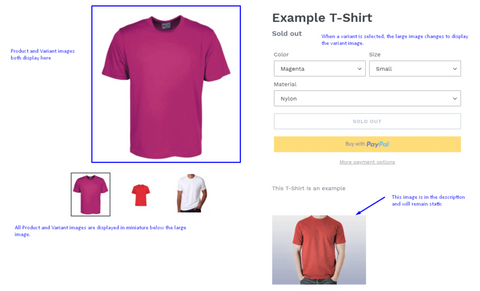
There are three different ways that images can appear on your website, so here is a diagram that should clarify things for you:

Press “Edit Website SEO.” Here you can edit how this page will appear in Google Search.

As you update this text, it will create a preview for you:

Back at the top of the page, there is another column to consider, so scroll back up.

“Product Type” is mainly used for creating collections, and is only visible from the backend of your store. So if this product is a T-shirt, set the product type to Shirts.
The “Vendor” section is also for your eyes only. This section is best used to keep track of who you purchase products from.
If you have made collections, you can assign your product to one of them.
Finally, you can add tags to the product, which help you organize your products.
That’s it! This is an easy way to upload products if you only have a couple.
Method 3: Use a Spreadsheet
If you have a lot of products, it can be tedious to upload all products using the Shopify backend. If you can’t use an app, you can still upload products to Shopify in bulk- and that involves
In the toolbar, click “products.” At the top of the page, click “import.”

A pop-up will appear, asking you to upload a .csv file of all your pre-existing products.

Click “download a sample CSV template” to get the template Shopify requires you to use. You’ll need to export your product data from your existing store, and paste it into this new spreadsheet, according to Shopify’s rules.
We’ve made this easy for you in our Shopify Product Migration Spreadsheet, which you can download at the beginning of this article. There is color-coding to show you what rows you need, and some of the rows will auto-fill using expressions we’ve written.
Whether you’re using our version of the sheet or not, you can continue to follow along with these instructions, because the column headings are the same.
Here is what each column requires:
Column A: Handle

Each product in a Shopify store has a unique identifier called a handle. Shopify knows that any row beginning with the “Example-T-Shirt” handle pertains to the same product. This is important because in this spreadsheet, there will be multiple lines all referring to the same product. In the Giga Spreadsheet, this field will be filled out for you when you add your product title. If you’re filling the spreadsheet manually, ensure there are no spaces or symbols (other than dashes) in the handle. Letters and numbers are fine.
Column B: Title

The name of the product. What you type in here will be the title of the product page:

Column C: Body

The description of the product. Whatever you type will appear on the product page. You can paste HTML here, or type plain text. Useful information to add here could be sizing charts, features and benefits, or shipping information.
This section is optional, and you might find it easier to create this text using Shopify’s text editor, which we’ll take you through further down the page.

Column D: Vendor

The vendor is not yourself, but who you purchase the product from. Customers do not see this information.
Column E: Type

The type of product. This can be used when sorting your products by collections.
Column F: Tags

Another method of organizing your products. You can have as many tags as you like, as long as you separate them by commas. For example, you might want to tag clearance products with “discount”.
This column is optional.
Column G: Published

This determines whether or not the product is available to be purchased on your website. The field can be either TRUE, FALSE, or left blank (which Shopify will consider to be TRUE.)
Columns H-N: Variant options.

Say you’re selling T-shirts in three colors (Red, Magenta, and Violet) as well as three sizes, (Small, Medium, and Large.) There are 9 permutations of these options.
In columns H, J, and L, you enter the names of the options. You can have up to three options, and these will appear as drop-downs on the site:

Columns I, K, and M are the different options that will be available in those drop-downs:

You’ll notice that in the spreadsheet, these are repeated multiple times:

This is to accommodate the additional variations of option 2:

So there’s a red in small, medium, large, a magenta in small, medium, large, etc.
When I am loading a product with multiple variants, I like to initially upload all of the SKUs, and then work backwards from the SKUs to determine what variants I need. That way you ensure all of your options are represented on the product page, and you aren’t creating any variants which don’t correspond to your stock.

Column O: Variant Grams
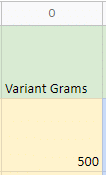
The weight of each variant, used to determine shipping rules.
Column P: Variant Inventory Tracker

This will be either “shopify,” if you want to use Shopify to track your inventory, or blank, if you don’t want to track inventory (e.g. if you’re drop-shipping.) If you’re using a third-party inventory tracker, such as ShipWire, you’ll put their ID in here.
Column Q: Variant Inventory Qty
If you are using only one location, there will be a column next to this called Variant Inventory Qty

This is the amount of stock of this variant that you have on hand. If you’re using multiple locations, this column will not appear for you, and your inventory will be controlled in another location.
Column R: Variant Inventory Policy

There are two options for this column, “deny” or “continue.” What this column determines is how Shopify should behave if this product goes out of stock. “Deny” means that customers will not be able to purchase the product if it’s sold out. “Continue” means they can.
Column S: Variant Fulfillment Service

If you are sending your products to the customer yourself, set this to manual. If you’re using a fulfillment service such as Amazon Marketplace, you can enter their ID in this column (e.g. amazon_marketplace_web)
You will have to set up that fulfillment service before adding it to this column. You can learn how to do that here.
Column T: Variant Price

Column U: Variant Compare-at Price

This figure appears alongside the real price, with a strikethrough, in order to make the price seem cheaper by comparison with a larger number.
Column V: Variant Requires Shipping
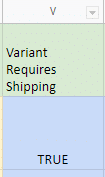
This can be either TRUE or FALSE – if you are selling physical products, leave this as “TRUE.” If you leave this column blank, it will default to FALSE.
Column W: Variant Taxable

This column can be either TRUE or FALSE. TRUE means taxes will be charged on this product, FALSE means they won’t. If you leave this column blank, it will default to FALSE.
Column X: Variant Barcode

If you are using barcodes/UPCs/ISBNs or another identification code with your products, you can paste that here and keep track of it with Shopify.
Columns Y-AA: General Image Information

There are three kinds of images that can appear on your product page.
- Product images not associated with a variant
- Product images associated with a variant
- Product images appearing in the body HTML of the product.
This section is where you can upload images that are not meant to correspond to a particular variant.
Again, here is a diagram of how images can appear on your product page.
In column Z, you can determine the order in which the images appear.
In column AA, you can define the alt-text for images, which Search Engines use to understand the content of the image.
Column AB: Gift Card status

Leave this as FALSE– you can only create a gift card in the Shopify admin. The reason this column exists is for when you export a list of existing products.
Column AC-AD: SEO metadata

This is where you create the title and description.

Columns AE-AQ: Google Shopping information

Leave these blank until you’ve connected your store to Google Shopping.
Column AR: Variant image URL

This is where you input URLs for images that correspond to variants. This URL will become the variant image of the variant that shares this row- hiding the columns shows this:

Column AS: Variant Weight Unit

Leave this blank- Shopify deals in Kilograms by default.
Column AT: Variant tax code

Leave this blank, unless you’re on Shopify plus.
Column AU: Cost per item

Here you can keep track of how much it costs you to purchase this item. Customers don’t see this, you just use this to keep track of your profits.
Conclusion
Congratulations! You are now able to load products into Shopify. This is the most time-consuming part of migrating your store from an old eCommerce platform to a new one, so it should all be smooth sailing from here.
To make this easier for you, we have made our own version of the Shopify product loading .csv. It’s color-coded to help you see what information is necessary and what’s not, and come of the fields will auto-fill with data- this should help make this process easier.
Let’s talk about how we can double your conversion rate.
We work with clients on a month-by-month basis to provide custom analysis & data-driven strategies, to optimise and increase online conversion rates for eCommerce & business websites.
If you are serious about growing your business, click the button below.