


Table of Contents for this Guide
Introduction
Today I’m going to show you a feature in Google Analytics called “Goals.” With these, you can monitor any action someone takes on your website. You use this to track drop-offs for conversions on your site. When you know where users are dropping off, your “weakest links,” you can attempt to correct them, slowly working towards an optimized conversion path through your website.
(If you’re not using Google Analytics, it’s an application that collects data on how visitors interact with your site. You can use this data to determine how your website is performing, and how to improve it. Here is where you access Google Analytics, here is how you install it onto your website, and here are Shopify-specific installation instructions.)
How to create a goal in Google Analytics
1. In Google Analytics, click “Admin” (lower left-hand corner)


To make a new goal, press the red “New Goal” button.
4. You will be brought to the goal setup screen. This is a three-step process where you choose your goal type, name it, and tell it what to track.
Step 1: Goal Setup
In the first step, Goal Setup, you are presented with three options: create a goal from a template, create a smart goal, or create a custom goal.
As of writing, the available goal templates are:
Revenue
- Buy tickets (completed online purchase)
- Register online (signed up for a class or scheduled an appointment)
- Buy Merchandise (completed online purchase)
- Donate (completed online donation)
Acquisition
- Create account (successful sign up, account, or view created)
- Submit content (submitted or uploaded a file)
Inquiry
- Find a location (viewed location or dealer information)
- Read reviews (viewed reviews and ratings)
- Upcoming events (viewed calendar or list or events)
Engagement
- Add to favorites (saved product or information to a list)
- Media play (played interactive media, like a video, slideshow, or product demo)
- Share/social connect (Shared to a social network or emailed)
These template fall under four categories:
- Destination Goals (goal is completed when the visitor loads a specific page)
- Duration Goals (goal is completed when the user has stayed on the website for a certain amount of time)
- Event Goals (certain interactions, such as video plays or button presses, count as a conversion. Requires Event Measurement to be set up in Google Tag Manager.)
- Pages/Screens Per Session Goals (goal is completed when the visitor views the specified number of pages.)
If you choose to make a “Custom” goal, you are able to specify whether your goal is a Destination, Duration, Pages Per Screen, or Event goal in the next stage.
The final type of goal is called a “Smart Goal.” You use it when you don’t have a specific action you want users to complete, but rather you want to measure the most engaged visitors.
Smart Goals use machine learning to look at your sessions and decide who, out of all your visitors, were the most engaged in your website, and who would be the most likely to make a conversion.
Cool, right?
It has some prerequisites for its use, however:
- Your Google Analytics Account must be linked to a Google Ads account (here is how to do that)
- Your Google Ads account must have sent at least 500 clicks to the selected Google Analytics view over the past 30 days. (if the linked account falls below 250 clicks over 30 days, your smart goal will be deactivated)
- Your view must not receive more than 10 million sessions in 30 days.
- You must have enabled Data Sharing in the Google products and services settings. (here is how you do that.)
If you do not meet the requirements, this is what you will see:

Step 2: Goal description
If you select a goal template, Google Analytics will automatically fill this section and bring you to section three, the Goal Details section.
If you select “custom goal,” you are able to define the name of your goal, and whether it’s a Destination, Duration, Pages/Screens per session, or Event goal.
Choose the most appropriate one for your needs and press “continue”

Step 3: Goal details
This screen looks different depending on your goal type.
For a Destination goal, the screen looks like this:

This is where you set the URL that the visitor must access in order to count as a goal conversion. So for example, if you sell circus animals and want to track every time someone visits the Elephants page, you would set this as:

But what if your website has two separate pages, /animals/elephants/african/ for African elephants, and /animals/elephants/indian/ for Indian elephants?
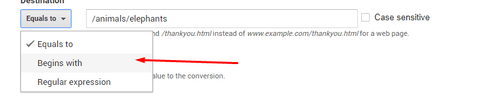
Use the drop-down to change “equals to” to “begins with”. This way, the full URL doesn’t matter, only what it begins with.
What if you also have the pages /animals/birds/african/ , and you want to track whenever someone visits the page of an African animal? You can do this as well, using the Regular Expression feature.

(If you don’t know what Regular Expressions are, it’s a system of text symbols that can be used to define search rules. Here is a tutorial on how to use them.)
If you are using a Duration goal, instead of the above text fields, you will be prompted to define the minimum duration that counts as a goal:

If making a Pages/Screens per session goal, you will be prompted to define the minimum number of pages needed for the goal to be counted:

If creating an Event Condition goal, you will need to input the Category, Action, Label, and Value that you entered in Google Analytics.

No matter what type of Goal your goal is, you can optionally assign a value to the conversion.

If you’re using the Event Conditions, this will look a little different:
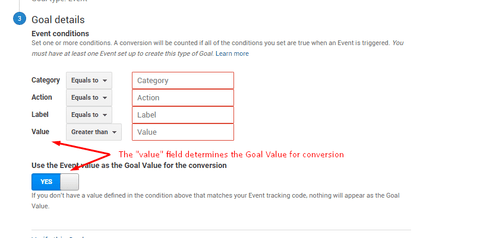
This is useful when your website is meant to make money, but is not an eCommerce website.
For example, if you are making a goal to track the number of times someone fills out your contact form, and you know that once someone contact you, you have a 33% chance of making a $10,000 sale, you can set the value of the goal to be $3,333.
Be sure to click” Verify this Goal”- this will calculate the conversion rate of the goal, based on your website’s performance over the past seven days:

You use this to check your work. While if nobody has ever taken this action on your site before, a properly set up goal funnel will typically return a non-zero conversion rate:
Here is what it looks like if there have been no conversions in the last 7 days:

When your goal is verifying properly, click “save”, and your goal is set up!
How to Enable Enhanced eCommerce Reporting (for Shopify Stores)
If you have a Shopify eCommerce website, you don’t need to set any goal values. Google Analytics can determine this for you! Here’s how:
On the admin page, choose “E-commerce Settings” in the right-hand column.

Then flip the “Enable E-commerce” switch:

This will make another switch appear, “Enable Enhanced Ecommerce Reporting.” Flip that switch too.

Ignore the “Checkout labelling” step- Google Analytics wants you to define each step of the checkout process, so it can give you a nice bar-graph visualization of your checkout process, but Shopify doesn’t support this functionality.

Instead, if you’re using Shopify, go to Online Store > Preferences

Then go to the Google Analytics section and check the “Use Enhanced Ecommerce” box.

Now, Google Analytics will be able to pull the actual value of your conversions from your Ecommerce store! Nifty!
How to create a Funnel Visualization Report
If you are using a Destination goal, you will see the “Funnel” option.

This is used to set up the Funnel Visualization report, which looks like this:

You use it when there is a specific path you want your visitors to follow, for example, going through the checkout. It allows you to see user behaviour at each step of the funnel, to help you identify if a lot of users are dropping off at a specific page.
A checkout Goal Funnel for a website made in Shopify would look like this:

(Shopify tip: use these URLs to track goals on every stage of the user experience)
| Algorithm | URL | Corresponding page |
| Equal To | / | Home Page |
| Begins With | /collections/ | Any Collections Page |
| Begins With | /products/ | Any Products Page |
| Equal To | /cart | Any Cart Page |
| Equal To | /checkout/customer_information | First page of checkout |
| Equal To | /checkout/shipping | Shipping method selection page |
| Equal To | /checkout/payment | Payment details page |
| Equal To | /checkout/thank_you | Checkout success page |
There is a switch where you can specify whether or not visitors must go through these specified steps in order to count as a goal. For instance, if you checked “required” on the above goal funnel, users who are coming to the checkout after getting linked to it from an abandoned cart email will not result in a goal completion, because they’ve bypassed the “added to cart” step.
Making an Effective Sequence of Goals
Now that we know how to set up a goal, we need to learn how to use them to derive insights on how to improve your store.
A goal is a conversion rate for a behaviour other than a purchase or form submission. They are best used to track user behaviour leading up to a desired action.
So let’s say you are a tax agent, and you want people to enquire about your services on your website. The first thing you need to do is fill out your contact form, and find out what URL you are brought to once you successfully complete the form.

Copy the URL for the contact form success page, and then make a destination goal in Google Analytics, as described in the first section.
Once you have had a few form submissions, you can check out the performance of your goal by visiting
Conversions > Goals > Overview:

This will bring you to a page that looks like this:

This is the Goals Overview page. You can use it to have a bird’s-eye look at all goals you’ve created:

Or you can use the drop-down to look at the performance of specific goals:

So let’s look at how our “contact us” goal is performing:

There are four different metrics for each goal, and here is what they mean:
Goal Completions are the total number of conversions for this goal in the given time period.
Goal Value is the total monetary value of conversions set for this goal- if you did not define a value for this goal when you created it, the value will be $0.00.
Goal Conversion Rate is the percentage of visits that resulted in a conversion for the goal.
Goal Abandonment Rate is the ratio of abandoned goal funnels versus goal starts. If you did not set up a funnel when creating the goal, the abandonment rate will be 0.00%.
Below this section, you can see the pages where goal completions occurred. If it’s a destination, goal, you will only see one URL:

But if it’s any other goal type, there will be a list of the URLs where this goal was most commonly completed on:

This section can be expanded out by clicking the “view full report” at the bottom of the chart:

This is actually the Goal URLs report:

This is basically a more in-depth version of the list on the overview page, which not only shows you the number of goal completions, but the goal value as well.
There is another report, the Goal Flow report, which is a different way of visualizing the Source/Medium list from the overview report:


Now that we’ve had some goal completions, we need to find out what people are doing on the website before they decide to fill out the contact form. That way, we can start to measure the fall-off between goal steps.
There is no path that users absolutely must follow to get to the contact us page: they can come directly to the contact page after visiting the home page, or they can mosey around the website a bit before they make up their minds that they need to contact you.
So to find out how people most commonly come to complete your goal, visit the Reverse Goal Path page:

This shows you the last three pages your users visited before they completed your goal:

Let’s ignore “Goal Previous Step – 1” – obviously users had to visit the contact page before making it to the goal completion location. Let’s look solely at Goal Previous Step – 2.

It looks like the pages that most commonly bring visitors to the contact page are the home page, individuals page, services page, and about us page.
You can make destination goals for these pages, too, so you can compare the number of people who visit these pages versus your goal.
Do you absolutely need to set up goals for these? No. You can always use the Site Content report in the Behaviour section to see the number of unique page views a page has received:


However, goals make it easy to compare at a glance. Especially if you’ve set up a goal funnel, as described in the previous section.
It’s a good idea to set this up for the ideal path that you want users to follow, for example if you find that users are more likely to make a purchase with you if they read an information page before filling out your contact form.
If you’ve created a funnel, you can look at it in the funnel visualization report:

Now you can see at a glance how well users are going from one page to another:

In the above example, we can see that the most significant dropoff occurs when users go from the cart page to the billing and shipping page. Although this is to be expected, it’s worthwhile testing out different strategies to improve the amount of users who make it to checkout.
If you set up eCommerce tracking, there is another overview you can look at: Conversions > E-commerce > Overview.

This is similar to the goals overview, but it uses the transaction data from your Shopify store to show you information about E-commerce macro-conversions:

Plus, there is a built-in bar graph that automatically shows you how customers shop on your website:


The shopping behaviour graph is like the funnel visualization, showing you key conversion points. For instance, in this we can see that the most significant drop-off come from trying to get Add-to-Basket users to go to checkout, and trying to get any user to visit a product page.
Now that we know where the most severe drop-off occurs, we can take measures to fix this. These are outlined on our Website Design guide.
There’s also a report meant to display user behaviour in each step of the checkout process, but currently this does not work with Shopify.

Setting up an Event Goal
The last thing we’ll cover in this article is how to create an Event Goal.
An event goal is when someone clicks a button, plays a video, or takes any other action on your website that cannot be identified by a change of URL. If you have your phone number displayed on your website as a tel: link, you will want to set up an Event goal.
The easiest way to do this is with Google Tag Manager.
Don’t have a Google Tag Manager account? No worries, here is how to set one up:
- Ensure you are logged into the same Google account you use for Google Analytics.
- Visit tagmanager.google.com
- Press “create account”

4. Complete the setup process

- Install the tracking codes as per instructions on the next page

- Google Tag Manager uses “triggers” to determine when an event takes place. So what we are going to do is make it so that your tel: link fires a trigger. There will be a “tag” attached to this trigger, which Google Analytics can read when the trigger is fired, and log this as a goal completion.
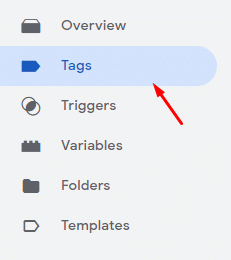
First, we need to enable the proper variables- what Google Tag Manager looks for. Click on “variables” in the left-hand toolbar

Press “configure.”

Then, because we want to track when someone clicks a link, press “Click URL”

Now, we’re going to make our trigger. Click “triggers” on the left-hand panel.

then press “new.”

Give your trigger a name:

Then click the “trigger configuration” panel to start creating your trigger.

There will be a pane that asks you to choose a trigger type. Since we only want the trigger to be triggered when a link is clicked, choose “Just Links.”

By default, the trigger will want to trigger any time a link anywhere on the site is clicked. We only want this to occur when someone clicks our telephone number. So change the radio button to “some link clicks.”

A box will appear, asking for what parameters the link needs to meet in order to count as a click.

Change the second dropdown from “contains” to “equals”. Then navigate to the page that has your tel: link, then right-click and choose “copy link address”.

Paste this into the third box.

Save this trigger.

Now that we have a trigger, we need a tag to go with it. Click “tags” in the toolbar
Then press “new.”

Click on “Tag Configuration.”

Since we are communicating with Google Analytics, select the “Universal Analytics” tag:

Since we want to track not a pageview but an event, change the Track Type to “event.”
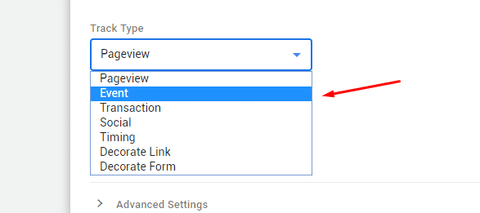
Here’s a familiar sight: the Category, Action, Label, and Value fields. Whatever we enter into this section will be used when we create the event goal in Google Analytics.

Consider “category” to be the name of this Tag as it will appear in Analytics. So name it as Phone Number clicks.”
We want the Action to be the URL that the user clicked. You can use variables for this. Since we activated the Click URL variable, all you need to do is type two opening curly brackets in this Action field, and then the Click URL should appear in a drop-down list.

If your phone number is in the header, or otherwise appears on multiple pages, you will want to know what page it was clicked on. So select “Page URL” as the label.

Leave the value section blank, unless you know about how much money an in-bound lead is worth to you.
Next, you’ll need to specify the Google Analytics account that this is meant to correspond to:


Paste your Google Analytics tracking ID in this field, and rename the Variable to “Universal Analytics Tracking Code”

Now, click on “triggering”

And choose the trigger that we made.

Save the tag, and press “preview.”

This makes your changes live, but only in the browser window you are currently in. In order to test your changes, you’ll need to install the “tag assistant” chrome extension.
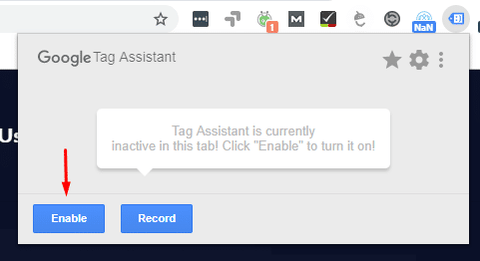
Once you have that, activate it by clicking its icon in your chrome browser:

And press “enable” in the popup:
Then visit your website. You will see a pane at the bottom of your browser window that tells you what tags have fired on this page:

Click on the tel: link on your page. If you set up everything correctly, a new tag will appear in the pane below- this means everything is working as it should.

Go back to Google Tag Manager and press “submit”.

Phew! Tag Manager accomplished. Now, make an Event Management goal.
Choose “custom” as the template:

Title your goal and set it to “event.”

You will see Category, Action, Label, and Value appear. The only field you need to specify is the Category:

So when a tag matching the category we had defined is fired, this will count as a goal completed. Verify and save the goal as you normally would.
Now you can see the goals tracked in the Conversions > Goals > Overview section, like any other goal:

To confirm that the events are being fired properly, visit Real-time > Events:

This gives you a real-time display of events as they get triggered on your website. If you click the URL you had tagged, the event should register on this page.

Conclusion
You should now have a broad-stroke overview of what you need to consider on your eCommerce web design journey. This is only a glimpse of the surface of all these topics, so be sure to keep educating yourself on web design in order to stay on top of the topic.
Zyber is a Digital Agency with ten years of experience in Web Design and eCommerce. We can help make the process of creating an eCommerce store as easy as possible for you. Use this form to get in touch with us, or call us on 09 280 3680 to discuss how we can help you.